
You love the idea of the Hello Bar service. It's a great website toolbar to increase email signups, raise user engagement in featured content, or otherwise focus a reader's attention. If you don't want to pay for the service or you have a particular set of needs not served by the service's configuration, what are your options? I outline Hello Bar alternatives, including making your own, below.
First a disclaimer: this post is targeted for a more technical reader and with on a focus on the Wordpress content management system (CMS). If you can at least configure a Wordpress theme and dabble in just a bit of theme code, you can handle this guide. If you're looking for a "one click" solution: Hello Bar is a pretty awesome service. Minus the cost. And the limitations. Alright, disclaimer over.
Here were my requirements when I went hunting for a Hello Bar alternative:
- It must integrate with an email signup form, preferably through MailChimp
- It must offer a slide-up from browser bottom and slide-down from browser top option
- It must be mobile friendly; based in responsive design
- It must be lightweight—use as little JavaScript and CSS as possible
And so I spent hours installing different Wordpress plugins promising, at first, all these features. I eventually ended up just trying to find plugins that would meet my most basic needs: email signup through MailChimp and bottom browser position. Ultimately, I couldn't find what I needed unless I shelled out some money for a paid plugin (which was still a dice roll) or relented and went with Hello Bar. Well, there was another possibility...
Roll Your Own Hello Bar Alternative
The actual frontend development for a email signup toolbar that slides up or down from the top or bottom of the browser that has some content in it is pretty straightforward. The slightly hard part is the extras like the actual CSS animation and responsive design so the toolbar would be mobile friendly. The really hard part is integrating a MailChimp signup form. MailChimp offers embeddable forms but you'll have to wreck the embed code in order to squeeze it into a typical Hello Bar space of about 40 pixels of height. Sidenote: don't forget tap targets should always be at least 32 pixels tall (and wide)!
MailChimp Email Signup Integration
During my adventures of trying to find a Hello Bar Wordpress plugin alternative, I stumbled across an excellent and well supported MailChimp plugin, MailChimp for Wordpress. It'll give you lovely integration between Wordpress and MailChimp: list syncing, user registration signup checkboxes, and...customizable signup forms. Even better, you can use the plugin to create a stored, customized signup form and then access that form with a shortcode. That means that now all we really need to do is call the form shortcode from our theme and wrap it in an appropriate animating, responsive website email signup bar.
6 Step Guide to your own Hello Bar Alternative for Wordpress
I decided to create my own Wordpress-based Hello Bar alternative that integrates with MailChimp. Here's 6 quick steps that'll let you do exactly what I did:
1) Obtain the MailChimp for Wordpress Plugin Form Shortcode
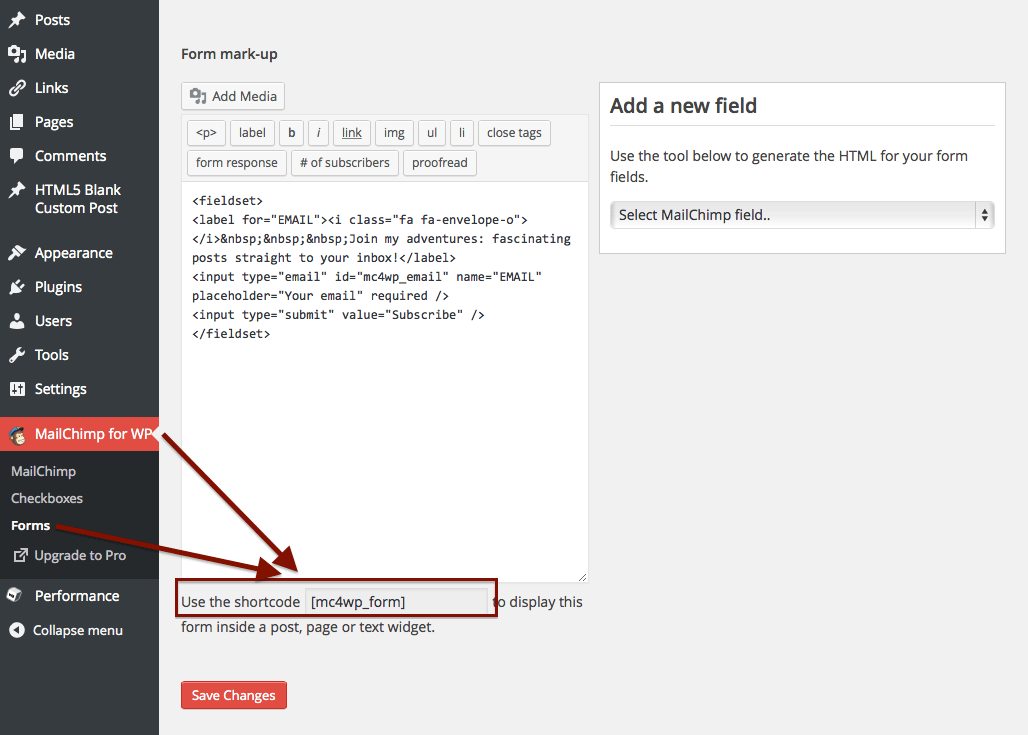
- Install the MailChimp for Wordpress Plugin
- Configure the plugin, connect it to your MailChimp account
- Hit the MailChimp for Wordpress "Forms" link
- Setup/adjust your MailChimp form and workflow as needed
- I recommend using the "Redirect to URL after successful sign-ups"
- Send the user to a "thank you" page you create
- Copy the shortcode as depicted, likely "[mc4wp_form]"
Now you have the MailChimp for Wordpress shortcode that produces your MailChimp signup form. Normally, you would paste this shortcode into a post or page. We want the shortcode to be displayed as part of our theme on all of our pages.
2) Insert the MailChimp Form Shortcode Into Your Theme
This step will largely depend on what theme you're using and where exactly it makes most sense to insert your new Hello Bar alternative wrapper element. I'm using the HTML5 Blank Theme in the working example. Here's how I've inserted the shortcode into my theme's header.php template, I've highlighted the appropriate code by wrapping it in "EXAMPLE" comments:
<body <?php body_class(); ?>>
<!-- wrapper -->
<div class="wrapper">
    <!-- EXAMPLE SIGNUP FORM WRAPPER -->
    <div class="signup-bar">
        <div class="close">
            <span><i class="fa fa-times-circle"></i></span>
        </div>
        <?php echo do_shortcode('[mc4wp_form]'); ?>
    </div>
    <!-- // EXAMPLE SIGNUP FORM WRAPPER -->
    <!-- header -->
    <header class="header clear" role="banner">
    <!-- nav -->
    <nav class="nav" role="navigation">
    <?php html5blank_nav(); ?>
    <?php get_template_part('searchform'); ?>
    </nav>
    <!-- /nav -->
    <div class="container">
Very simple. There's just a few div elements to wrap the form for styling, a user interface button to close the bar, and the shortcode embedded. You'll notice the key here is the Wordpress PHP function do_shortcode() which allows you to embed a Wordpress shortcode within a theme's PHP template file. No actual form elements are inserted into your theme. Whenever you want to alter the form text or change the email input, just keep using the MailChimp for Wordpress plugin's form builder which will update what the shortcode produces.
I've inserted the code "above" the content in this example; you could just as easily insert the code after your content which may be better for search engine optimization (SEO) purposes. This assumes your .signup-bar element will be fixed or absolute positioned with Cascading Style Sheets (CSS).
3) [Optional] Utilize Font Awesome for Beautiful Iconography
If the <i> element and CSS classes look strange to you, they're just inserting a Font Awesome icon for the close button. You could substitute a simple "X" or an image here if you're not into Font Awesome.
Sidenote: The quickest way to setup Font Awesome is just to insert the primary stylesheet from their content delivery network (CDN) in your <head> element (or late late it before the </body> tag close):
<link href="//netdna.bootstrapcdn.com/font-awesome/4.3.0/css/font-awesome.min.css" rel="stylesheet">4) Use This CSS in Your Theme to Style Your Hello Bar Alternative with Animation
You'll want to style your container element and some of the elements within. I'm going to give you the CSS from my style.css I use but make sure you personalize it. Try different colors, sizing, animation speeds, etc. One of my favorite parts about this specific alternative to Hello Bar is that technically the core functionality requires no JavaScript since the animation relies upon just CSS.
/*
 * Signup Subscribe Bar
 */
.signup-bar {
    background-color: #3bbfa7;
    position: fixed;
    z-index: 2;
    width: 100%;
    padding: 0.5em 0;
    font-size: 1.4em;
    text-align: center;
    box-shadow: 0 0 10px rgba(0,0,0, 0.35);
    height: 43px;
    bottom: -43px;

    -webkit-animation: signup 2s ease forwards;
    -moz-animation: signup 2s ease forwards;
    animation: signup 2s ease forwards;

    -webkit-animation-delay: 3s;
    -moz-animation-delay: 3s;
    animation-delay: 3s;
}

@-webkit-keyframes signup {
  100% {
     -webkit-transform: translate(0, -100%);
     transform: translate(0, -100%);
  }
}

@-moz-keyframes signup {
  100% {
     transform: translate(0, -100%);
  }
}

@keyframes signup {
  100% {
     transform: translate(0, -100%);
  }
}
.signup-bar fieldset {
    border: 0 none;
    padding: 0;
    margin: 0;
}

.signup-bar label {
    color: #fff;
    display: none;
}

.signup-bar .close {
    float: right;
    margin-right: 0.5em;
    cursor: pointer;
    font-size: 1.6em;
    color: rgba(0,0,0,0.5);
}
.signup-bar .close:hover {
    color: rgba(0,0,0,1.0);
}

.signup-bar input[type=text],
.signup-bar input[type=email] {
    border: 0 none;
    padding: 0.25em 1.0em;
    font-size: 1.0em;
    margin: 0 0.5em 0 0;
    width: 50%;
}
.signup-bar input[type=email]:focus {
    outline: none;
    box-shadow: 0px 0px 10px rgba(255, 255, 255, 0.75);
}
.signup-bar .mc4wp-success {
    color: #fff;
    font-weight: bold;
    line-height: 2.0;
}
.signup-bar input[type=submit] {
    border: 0 none;
    background: none;
    background-color: #592055;
    color: rgba(255,255,255,0.95);
    text-transform: uppercase;
    font-weight: bold;
    padding: 0.5em 1.0em;
    border-radius: 4px;
    font-size: 0.9em;

    box-shadow: 0px 0px 1px rgba(0, 0, 0, 0.25);
    transition: background-color 0.3s ease;
}
.signup-bar input[type=submit]:hover {
    background-color: rgba(90, 32, 86, 0.65);
}
There's a bunch of unnecessary CSS code for the "pretty" effects; you could slim this down a lot. You'll want to make sure the properties work for whatever your target browser support is, too. My primary focus with this code was just modern mobile devices and up-to-date major browsers. The most interesting facets are the use of the animation property and transform property within the key-frames selector. Those are what give us the animation and delay for the toolbar itself. Tweak these to your liking; try different types of animations. Move your website toolbar to the top of the browser (as long as you're not overlapping your menu system). Try different implementations!
5) Make Your Hello Bar Website Toolbar Responsive and Mobile Friendly
You may have noticed the label is hidden by default in the above CSS. That's because this CSS code is intended for a mobile friendly baseline theme. With a mobile first strategy, we start with how we want the elements to look on a small screen device and then scale up the design with media queries. Here's my media query and additional CSS code for larger screens:
@media only screen and (min-width: 70em) {

    /* Signup Bar */
    .signup-bar label {
        display: inline;
    }
    .signup-bar input[type=text],
    .signup-bar input[type=email] {
        margin: 0 2.0em;
        width: auto;
    }

}
These property overrides occur "later" in your stylesheet. For screens wider than 70em (roughly landscape mode tablet, laptop, and desktop screens), this media query will enable more information in the toolbar and a bit more white space.
6) [Optional] Add JavaScript for Your Hello Bar Alternative in Wordpress
Lastly, if you'd like a close button which hides the toolbar, you'll want to add just a dash of JavaScript. This is optional. The animation is completely CSS based so you can get away with the entire core functionality using the MailChimp Wordpress Plugin, HTML/PHP for your theme, and a bit of CSS.
Here's the jQuery (make sure you have the jQuery framework setup in your theme) code in my scripts.js I'm using to fade out the website toolbar when the close button is clicked or tapped:
(function ($, root, undefined) {
    $(function () {
        'use strict';
        // DOM ready, take it away
        $('.signup-bar .close').on('click',function(){
            $(this).parent().fadeOut('slow');
        });
    });
})(jQuery, this);
The function will simply fade out the entire .signup-bar element when the .close element is activated.
Why Write your own Hello Bar Alternative for Wordpress Implementation
There's certainly some positives and negatives to using this approach to create this feature.
Pro's
- Full control over the design means a unique, branded look to your bar
- No ongoing or upfront costs
- Implement your own tracking with Google Analytics events
- Lightweight, can be pure CSS
- Integration with any third-party service or your own forms
Con's
- Need to spend 15-30 minutes implementing code
- Ongoing maintenance
- No out-of-the-box interaction tracking or analytics
- Does not recognize if the user has already engaged with the signup, call to action, or content you're featuring
Overall, I spent less time writing the code from scratch to do this and integrating it with the Mailchimp Wordpress Plugin than I did searching for, testing, and tweaking existing plugins. If you don't want to spend the money on Hello Bar or have a functional and design need not met by the service, this is a great way to give yourself more flexibility.
Other Wordpress Hello Bar Alternative Plugins that Might Work
I spent quite a bit of timing reviewing other similar plugins for Wordpress to the Hello Bar service. If your needs are a bit more flexible, one might work for you.
These plugins will get you partly there and are the best of what I reviewed.
Do you have your own Hello Bar alternative that you think should be added or a better solution? Let us know! Love this guide? Consider sharing it!
Are you having trouble with gathering further user engagement in your Wordpress implementation? We can help. Questions, feedback, comments? Ping us on Twitter or other networks to connect with us.